

This world is going modern day by day. In the past, sellers and buyers communicated face to face only. But today, we can see so many online eCommerce websites, and most buyers buy from them without any hesitation.
So today, I’ll teach you how to create an eCommerce website with WordPress. I’ll show you how to create an e-commerce website quickly, but it’ll be modern and elegant-looking as well.
How to Create an eCommerce Website with WordPress: A Step by Step Guide
There are numerous paths to creating an eCommerce website. But I will show you the easiest way to make your dream e-commerce website. In this lesson, I will use WordPress CMS as it is now one of the most popular platforms. Besides, It’s easy to understand and fully drag and drop. You don’t need any coding knowledge for that. You will be guided fully step by step to build your eCommerce website with WordPress. So, without further talking, let’s get to the point.
Step 1: Register a Domain and Get Hosting
It’s your first necessary step to uphold your website to the customers. You need a secure Domain name that goes similar to your brand name. After that, you need a hosting server to keep your website online. The hosting server must be –
- Fast
- Reliable
- Secured
- Great Customer Service
- SSL Certificates Enabled
If you want my suggestion, then I’ll strongly recommend you use Bluehost or NameCheap. Trust me, they are one of the most reliable hosting providers right now, and your money won’t get ruined.
Step 2: Install WordPress
After completing all your purchasing criteria, you will get a couple of emails from the hosting providers. You can easily find your cPanel login information. Go to your cPanel dashboard, and you will see the app installer. From there, you can install WordPress. Follow the following steps to make it perfectly –
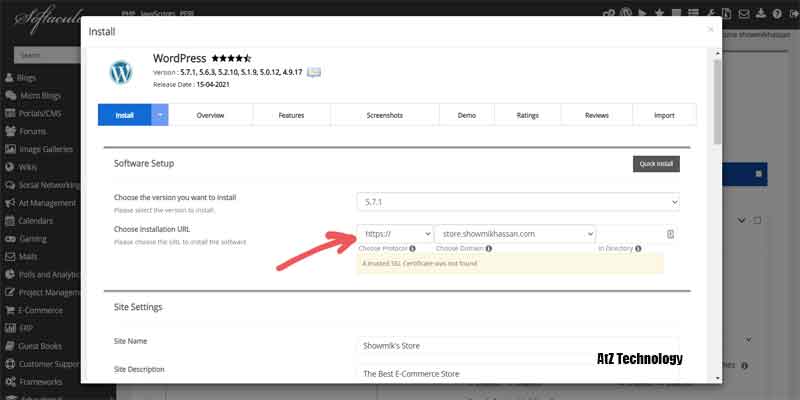
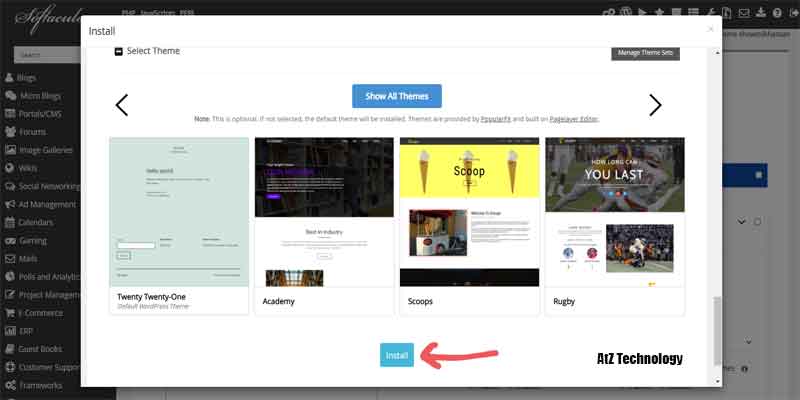
- Click on quick/One-click install WordPress
- Select your Domain name (Select https:// for Secure SSL)
- Put all your website information.
- Click Install.
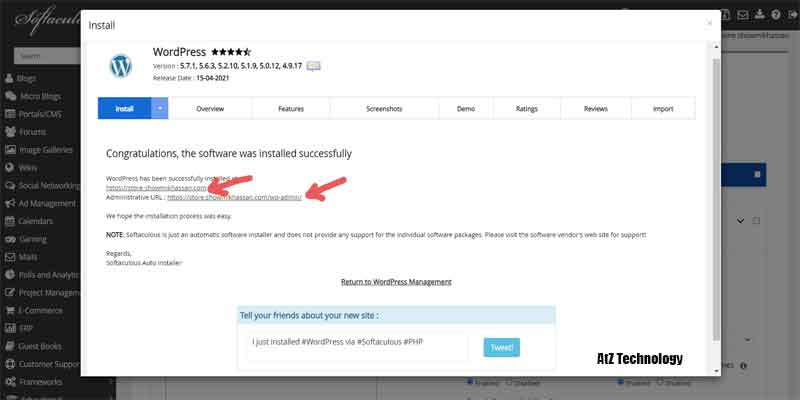
Once you have done all of that, you are ready to go to your WordPress Admin Panel.
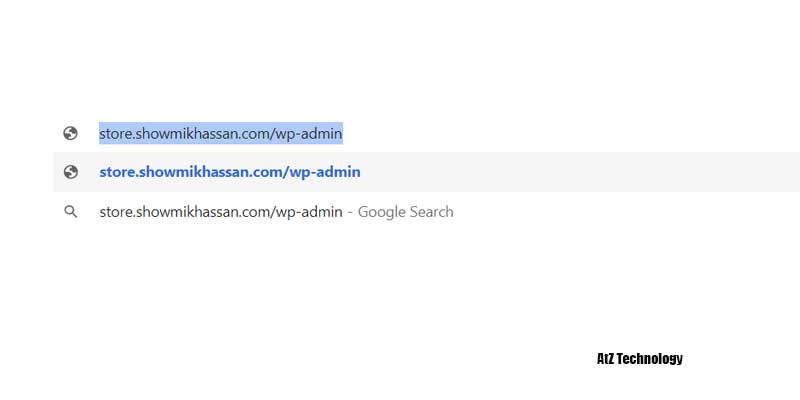
How will you log in to your site? Easy Right! Just type your website address in the browser and add to it “/wp-admin” the Dashboard will appear soon.
Step 3: Log Into your WordPress Dashboard
You can log in after completing the installation. If not, then you can find your login information on your email address that you provide during the installation.


Type your username and password and press login. Gracias! You are now ready to create and design your e-commerce website.
Step 4: Get Familiar with your WordPress Dashboard
Whenever we install WordPress on a new domain name, there are few basic settings that we have to do, and there are few basic things that you have to understand.

Now. First of all, this is your dashboard, and under your dashboard, you’ll see several widgets available. These widgets are not helpful so that you can do one thing again, just untick all these things from here. So click on-screen options. And an untick.

On the left-hand side, you have several options. The first option is the dashboard, and we have seen that thing. The second option is their post option. So from this option will be creating different blog posts. You can create new blog posts from there.

Then the third option is your media option, so all those different media files, all these different images you see on your website. Everything will be present here. So if you want to upload a new media file, you can do it from yours.

After that, we have our page option. You will be using this option to create different pages like your homepage, about page, contact page, and so on. Then you have the comments option. You can reply and manage other’s comments from that option.


Let me have another vital option which is your appearance option. Now under your appearance, you will see a few themes are already installed for you.
And one theme is already activated for you, so in this case, the 2021 theme is activated for me. Now this style of your website that you see right now.
A theme changes the appearance in the style of your website. You should always make sure that only one theme is installed for your website.


Then after that, we have the plugins option. Now under plugins, you’ll find that some plugins will already be installed for you. You can do one thing.
You can delete them because we don’t want any extra plugins on your website. Because if you have more themes and plugins, and plugins on your website, that will make your website load slower. So obviously, we don’t want that thing. We want our website to load very fast now.

What is a plugin? A plugin is your software or an add-on that will add extra features and functionality to your WordPress website. For example, right now, we don’t have any features or functionality related to E-Commerce. We cannot create any products. Customers cannot add them to the card taken onto the checkout, and also to add all these features will be using different plugins.
Then at the left inside will see the settings option. Click on that. You can change your site title and description. Make sure to put your primary email and click on anyone who can register. Otherwise, no one can create an account on your site.

So, it’s an important one to remember. Under the settings, there is a sub-option called permalink. Make sure you select the post name from there and now click on the save change. It’s crucial for SEO.

Step 5: Install E-Commerce Theme
There are tons of themes available around us. Most of them are pretty decent. There are so many premium themes as well as free themes. In this tutorial, I’ll use a theme named Woostify. It’s a free theme, but you can purchase the pro version if you want some unique features.
So, go to https://woostify.com/ and click on Get Woostify Free. A popup will come to you to put your email and subscribe to their newsletter and download the theme.
But if you are not interested in the newsletter, then click on No, thanks! I just want to download the theme. It will redirect you to the download page; now click on Download Now, and the theme will be downloaded soon.


Now head over to the WordPress Dashboard go to Appearance>Themes>Add Themes. Then upload the Woostify theme zip file from your device and install it. After a few moments, the install will be finished, then click on activate.


Once you have done that, we will head up to the required plugins section.
Step 6: Download and Install Required Plugins
Now, for the required functionalities for an eCommerce website, you need some plugin to install. Go to the plugin section and search for each of them and install and activate as well.
List of Recommended Plugins
- Elementor
- WooCommerce
- Variation Swatches for WooCommerce
- TI WooCommerce Wishlist


You can install them all one by one, then come to the plugin section. Now from the bulk option, select all the plugins and activate all of them at once. Once you do that, you will find too many setup wizard notifications. Don’t worry; just click on the dashboard, and you are good to go.

Step 6: Set Up WooCommerce Plugin
It’s the must and most important plugin. Without it, you can’t be able to sell your products to customers. Now go to the WooCommerce section from your dashboard, and a setup wizard will appear.


The first one is Store Details. Fill in all of your store information, and then click on continue. Second, select your product type from the industry tab.
Third, choose your product type. I’ll choose the physical product from there. Now from business details, you can select how many products you want to sell.
Then some marketing features will appear. Disable those buttons as we don’t need them right now. After that, the plugin will ask you to choose a theme, but we already choose one. So stick with it.
Now, the initial process is done, and they will ask you to add your product. But we will add products later. Go to the tab of the WooCommerce settings from the left, and you will redirect to the general tab.
From there, change the things you need to. Select your selling and shipping location. If you need to change your currency, then you can do it from here.


Now head to the products tab. Not many things need to be changed. You can change the weight and dimension unit from here. Now one of the important sections is the shipping section.
Let’s head towards the shipping tab. You can add different shipping zones. Click on Add Shipping Zone and fill the form. Insert the Zone Name, select your Zone Regions, and now click on Add Shipping Method. You can choose three options from there.
- Flat Rate
- Free Shipping
- Local Pickup

You can select each of them based on your demand. I’ll choose a flat rate as I want my customers to pay a slight charge for shipping. Now click on edit, and a tab will appear. You can rename the title, choose your tax options and insert how much you want to take per shipping.


From the shipping options, tab tick marks the hide shipping costs until an address is entered.
Now, go to the Payments tab, and from there, you can manage different payment options. From there, toggle cash on delivery and click on setup. Edit your details if you want. Then come back to the section again, and from there, you can add bank transfer or PayPal if you wish. And that’s all for the settings of WooCommerce.

And it’s time to add some products to your store. So, go to the Products and click on Create Products. Then you will find every tip on each section. First, add your product title. Then provide a lengthy description of your product. You can add images and videos from there.


Now the most critical section is the Product Data section. You can select different types of products like simple, grouped, affiliate, and variable products. For the first one, we will choose a simple product.
Under the section, you will find six different tabs. Each one of them has its purposes. The first one is the general tab, and from here, you can insert product prices. You can add a sale price on it for giving discounts. You can also add a schedule for the discounts.

The next one is the inventory tab. From the inventory section, you can add SKU (Stock Keeping Unit). I’ll keep it simple by giving the name PRODUCT-1. But you need to be aware that all of your product SKUs must be unique. Besides, you can manage your stocks from there.

Now head towards the shipping tab. You can provide your product details from there. For this demo product, I’ll choose random numbers. After that, you can add your cross-sell and up-sell products in the linked product section. Right now, we don’t have any products.
So, I’ll keep this blank. And from the attribute tab, you can add attributes of the products like color, sizes, amount, etc. But for a simple product, you don’t need to create or select any attribute. It is used only for variable products. And from the advanced tab, you can add a purchase note and manage your review.


Now, go to the short description and add the product short description. There are some other options on the right side of the page. You can add different categories, add product tags, product video URLs and product images. I’ll add some dummy categories like Category One to Category Four.


Now, after the category option, you can add some tags to your products. Tags are similar words to the products that people search for. I’ll add two tags named Shirt and Clothes.

Now, go to the Product Image section, and you’ll be asked to upload or Select Files. I’ll upload some dummy images and select one from them.
Also, I can add more pictures of the product from the Product Gallery section. All done. Now hit on the publish button above the area. Your product will be uploaded soon.


So, you can add as many products as you like. You can add all the products at once, or you can add them later on. Now let me show you how to add a Variable Product.
It’s not that difficult. Just change the Product Data type to a Variable Product, and now you can implement the attributes and variations.

But you need to go to the Attribute section under the Product tab. From there, you can add attributes of your products. Give a name of your attributes. I’ll make it a Color. Now select the type of it. On the dropdown, you will find color. Now click on the add attribute.

On the right-hand side, you will find the section of the Color attribute. Now click on configure terms. Give the name of the color you want to add and select the color from the color picker. Now click on add new. Your color will be added. You can add as many colors as you want.


Now go back and add a size attribute. Give a name Size and select a button from type. Click on add attribute. Again go to configure terms and add the sizes you want. I’ll add four sizes like S, M, L, and XL for shirt sizes. Now add a new product.
Everything will be the same, like simple products, but in Product, Data select Variable Product. Now, from the Attribute tab, add color and size. Click on the values section and add all the color and size names. On both of them, tick on Used for Variation. And now click on the save attribute.


Now click on the variation tab and select Create all variation from the attributes. Hit on the go button, and all of your variations will be added. Now you can edit all the 12 items individually.

Click on the dropdown button of Black L, and you will find the option of edit. You can add all the details you want, and you can delete some variations if you wish. Once you are done with that, you can click on save changes. Now, after completing all the changes, you can publish your product.

Step 7: Create your Homepage
Finally, the WooCommerce setup is done. Now it’s time to create a beautiful homepage for our website. Directly from the dashboard menu, hover on the Pages and click on add new. Now give a title to your page. As it’s a homepage so give a name Home and click on publish.
Now from the right side, you’ll find a container option. Select Full Width/Stretched. Then from the top, click on update. Again do to the dashboard and under-setting go-to reading. Now from your home page display, select A static page. Then from the dropdown, select Home. If you go to your sites from the dashboard, you will find the homepage you created earlier instead of the default post page.


As I already mentioned earlier, we would use Elementor page builder to design. So, click on edit with elementor. It’ll take you to the default elementor dashboard. From there, you can add and customize different types of elements and design your homepage.

Now, go to the dashboard and then read underneath the Setting section. And change this –
In this section, I’ll teach you how to build your homepage with elementor from scratch.
Step 8: Edit with Elementor
So, from the elementor dashboard, you will find so many different things. When redesigning using elementor, we have to follow a particular process. For example, we have to create a section first, and we have to add different elements in that section to create a new section.
You click on this plus button and select how many columns you want in that section. For example, we want 3 columns. So, choose 3 columns.
Usually, choose that option now as you can see on the left-hand side where some other options you had top it says to edit settings.
Go back to the elements to click on elements and drag them on the section’s column. Click on the 9 dots icon, you will be directed to this page, and you can see there are so many different elements that you can use to create your website.

For example, if you want to add a button. You can simply use this button element. So you have just to drag and drop this element wherever you want. And as you can see, it will already have a particular design. If you wish, you can go ahead and change the design.


You can change the title; you can change the text; you can change the link and all the basic things. Another one or the second one is the style. So, from here, you can change its color, background color, text color, all this typing thing, and under advance, you can do some advanced base. For example, you can add some margin padding; you can change the Z index. You can add some CSS classes motion effect back on border positioning responsive, all these things now.
There are some more things, for example, or you have premade layouts, premade sections, but we’re not going to cover in this article. Let’s start creating our first section, which is this simple banner. To create a new section, we just want one single column, so I’ll select this first option, a single column.

First, let’s add some text to that section. Drag a text editor element on that, and I’ll do some styling. First, change the text color. I’ll choose a darker color. Change its typography. Make the font family Poppins, text-size 16, transform uppercase, and weight 500.

Now, drag a heading element under that text editor. Again change its content, color, and typography. Put your content and if you want to give the content line a break, use the <br> tag.

Then again, you can use a text editor element and add some text also. Edit your content and give them a style. Now, add a button element under that, and you can change the title, add color and change the typography. You can add a box shadow there.

Then hover on the column and click on it. Go to the advanced section. Unlink the margin values. Then add 50px top and bottom padding.
Now, let’s add a background image to that. You can create your website background banner images, or you can hire a designer for that. I’ll add my website’s dummy background here. Click on the section 6 dots and go to the Style tab. Now select classic background type and add an image.
Head towards the size and select cover, and your image will look fit in the background. Now, click on update, and your progress will be saved.


You can design your homepage like this. Now let’s add a new section. You can copy your previously made element by right clicking on that. I’ll copy the first element from the banner and paste it to the recently made section. Then you can re-edit and redesign the area. Change the content, make it centre align, and change the typography also.

Add some padding to the section you are working. Add 50px top and bottom padding. Then add a heading underneath the text editor and rewrite the content as Shop by categories.

From there, let’s add another 2 column section. And on the right column, add an inner section element. Now drag image elements into it.
You can add custom captions from the edit image element. Also, you can use a custom link so that whenever someone clicks on the image, it will go to the desired link. You will find the category links URL on the product category section from the dashboard.
Now click on the black edit column icon and go to advanced settings. Inside CSS Classes type woostify-shop-category. Type it on both columns, and the category look will change.


To make it more flexible, click on the section column 6 dot and narrow the column gap. Also, from the right side, add some minus padding (-10px) in the inner section element.

Now, you can do it faster by duplicating a similar section, column, and elements. By right-clicking on it, you can duplicate each section. Then drag it to the desired position and edit your content. Under that, add a shortcode element.

If you can’t find any element, just type on the search bar. Drag it into the section, and you can WooCommerce different shortcodes to display your shop’s product. You can find so many shortcodes for various aspects here –
Now, inside the shortcode element type – [products limit=”4″ columns=”4″ visibility=”featured” ]

Click on Update, and you are good to go.
So, that’s how you can design a page by elementor. You can play around with all the free elements available in it and make it more elegant-looking.
Step 9: Create Menu for your Website on

We don’t have a menu yet, so let’s create a new menu and do that thing over appearance and click on menus. Now, first of all, let’s give it a name. So first, I want to create my main menu. So give it a title of the Main Menu. They can create meaning, and after that, we have to select all the different pages you want to display. Like home, shop, and other pages if you wish to or create. Also, make sure to check the tick mark underneath the menu section called Primary Menu.


Step 10: Customize the T1 Wishlist Plugin
Let’s customize the wishlist plugin for our eCommerce site.


Step 11: Manage Shop Page Widgets
Your shop page will appear with a sidebar on the right side but no widget will be there. So, let’s add some widget from the WordPress manage widget section.


And now your product page will look like this. You can filter your product search by price, color and so on.

Step 12: Create and Customize the Contents of All Pages
Your theme automatically generates all the custom pages you need for an e-commerce website. So, it’s your duty now to change all the contents from your dummy template. For that, you can use Elementor Plugin.
For extra functionalities, you can purchase the Elementor Pro version. With that, you can get some additional advanced features, sections design, and modules also. By using that, you can simply drag and drop any content or images. You can edit all the texts as your own and put all kinds of feature images you want to use on your e-commerce website.
Step 13: Edit your Important Pages
Your e-commerce business must have some rules and regulations. Besides, you can add the history and about section of your website. By adding contents on Privacy & Policy, Terms & Conditions, And, Contact Us, FAQ Page, you can make everything clear to your customers.
Put the accurate address on the Contact Page. You can also add a feedback section on that page. So that customers can provide any kind of feedback if they want.
Not everyone needs a FAQ page, but I think it’s a good idea for any online store and WooCommerce and WordPress make it very easy.
Step 14: Do Some Marketing for your Growing Business
When you create an online e-commerce website, you need to elevate your item to build traffic and drive deals.
In the wake of building an e-commerce website, you’ll require a solid promoting plan to carry the potential clients to your website and save their love for bringing business back.
Offering master administrations for business are instructing, SEO, pay-per-click advertising, and that’s just the beginning.
Search Engine Optimisation
Remember to work for SEO improvement for each item. Utilize the most recent direction on SEO to help individuals discover your web-based business site, objects, and administrations on the web.
For SEO, are Yoast SEO Plugin. It’s one of the most effective plugins for SEO right now. You can do on-page SEO easily with that plugin and make your e-commerce website rank higher.
Social Media Marketing
Connecting your e-commerce website with Facebook, Instagram, and other marketing plugins. Empowering social sharing for your items – it’s a single tick measure.
Email Marketing
Offering free mix with MailChimp, AWeber, Campaign Monitor, and more for email promoting and marketing. Adding clients to your current email advertising records so you can illuminate them about new contributions
Generating New Blog Posts
Remember a blog or an eBook for your website to share connecting with significant substance, build trust, and pull in new clients for your website.
Conclusion
I think it has been clear to you how to create an eCommerce website with WordPress in 2021. In this lesson, we learned all kinds of necessary steps to build our eCommerce website. I hope your advertising helps you lead your dream eCommerce website further ahead. By following these simple steps, you can make an eCommerce site and other business-related sites if you want.