We are Living in a Digital World right now. That’s why sometimes we need to showcase our portfolio. But I think every person who can afford, must have a portfolio website. By showcasing your portfolio website you can enrich our productivity and professionalism.
But Do you know, How to design a personal website? If not then nothing to worry about. I’ll teach you How to Make a Personal Website from Scratch by holding your hand in this article.
So take your favourite snacks and drinks and let’s build your personal website:
How to Make a Personal Website from Scratch - Necessary Steps to Learn
I designed this full article into several steps so that you can learn easily. This is a complete beginner tutorial but if you have some knowledge about WordPress, Hold on a second!
No need to leave because you will learn some extra tips and tricks about developing professional portfolio websites. So, enough talk, let's get to work.
Why Choose WordPress?
To be honest with you, there are so many CMC platforms to build a new website from scratch. But it’s really easy to choose the best one.
Yes, I’m talking about WordPress. Do you know, around 34% of websites all over the internet built on WordPress? You can say that one of the three websites that you visit is built on WordPress CMS.
Let’s know some key features about WordPress:
- It’s totally Free
- It’s an Open Source platform
- It can run any type of website
- It’s SEO friendly
- It’s Fast, Optimized & Secured
Domain & Hosting
How will you showcase your website if you don’t have a Domain Name or Hosting Server? Ok then, buy a domain name that will help people to identify you easily.
You can choose any name if you want. However, I strongly suggest you pick a domain name of your Full Name or Nickname. As an example: www.someone.com (I prefer .com for Portfolio Website).
Now you need a Hosting server where you can put your website live. There are so many options around you. But if you ask me which one is good for a beginner then I’ll suggest NameCheap or BlueHost. No, I’m not promoting them. As I already used several hosting services, those two performed really well compared to other servers.
So, search for any one of them and buy their basic plan. Provide all the necessary information and complete your purchase. You’ll get a couple of emails. Open them and you’ll find your cPanel access information. So, grab that and login into your cPanel.
Install WordPress
After login into your cPanel, you will see different types of blocks. From there, you will find an App Installer. Click on that and you will see different types of CMS. Select WordPress from there.
You’ll find the WordPress install interface. Provide all the necessary details of your website and WordPress admin panel information. Remember the ID and Password which you put there and then click install. Wait a couple of minutes and you are ready to go.
Now, open a new tab from your browser and write your domain name. Then write the prefix wp-admin (Example: www.someone.com/wp-admin). Alright, you will find the login in a panel of your website. Provide your WordPress ID & Password and press login. Congratulations! You are in your website dashboard now.
Getting Familiar with WordPress Dashboard & Clean-Up

You can see your dashboard in front of you. It looks pretty overwhelming, right? So, let's fix this. On the right top corner, you will see a box named Screen Options. Click on it and untick all the boxes except the Welcome one. Looks pretty clean right!

Now you will see so many tabs on the left side. Now click on the post button and delete Hello world! Post. It’s not fully deleted as it goes to the trash folder. Click on the trash and click on the Empty Trash button. Amazing work.

Now go to the Pages and do the same.


After that, go to Settings then click Permalinks. Make sure Post Name is selected. It will help you in SEO.

You can also change the dashboard style by clicking on User. Select your desired color scheme and Time and Date formats. Then press on Update Profile.
Install Theme
There are thousands of themes stored on WordPress. You can choose anyone from them. But Astra is one of the most popular themes from them. Go to Appearance and Search for Astra.

Click on Install then Activate the theme.


Once you have done that, Astra will ask you to install the Starter Template. But it’s optional.

By clicking on the Get Started button, Astra will install the Starter Template plugin.

It’s a helpful plugin as you will get access to some free templates and blocks. But you already know that we will make the whole website from scratch. So, We won’t import any kind of templates.
Install Elementor Page Builder
Now it’s time to install our page builder. Do you know Elementor is by far the most popular page builder? There are some other page builders like Divi, Gutenberg, Brizy and so many. But we will use the free version of Elementor. You can use Elementor Pro if you want. But in this tutorial, I’ll show you how to make a personal website from scratch by using the free version of Elementor.
Go to the Plugin section. Click on Add New and search for Elementor. Click on Install and Activate as well.


Install Essential Addons for Elementor
Now, again go to the Plugin then Add New and search for Essential Addons.
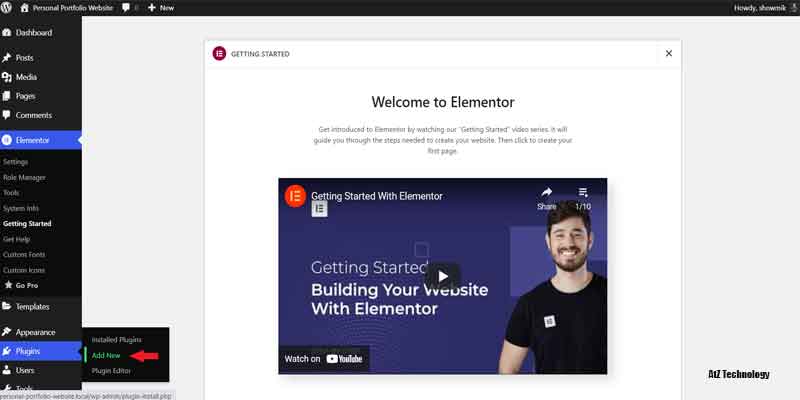


I know you want to know what is this plugin for? Actually, this plugin will help us to use extra modules. To make your portfolio website look modern and creative this is a must-have plugin.
Create Our Website from Scratch
So, we completed our basic part of How to Create a Personal Portfolio Website. Cool! Now, it’s time to design our website. We are going to design our website by using Elementor Page Builder. So, let’s get started.
Create Necessary Pages
So, to design our website at first we need some pages to be created. Go to the Pages from WordPress Dashboard and click Add New.


Then give a name to the title (Example: Home) and click on Publish twice. Well, the custom page is created.


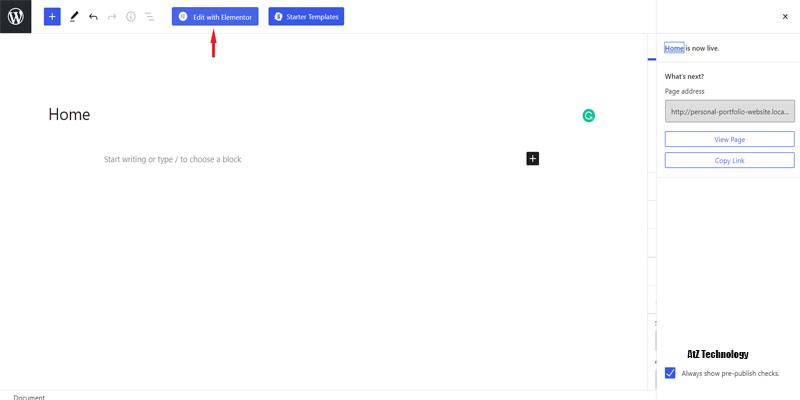
Now to see the page as a Homepage you need to change a setting. Go to Settings>Reading then display your home page as a Static Page. Then from the dropdown select Home. Now if you type your domain name you will see the page in the front. Isn’t that amazing!

Edit with Elementor
Now click on the Edit with Elementor button.

The page builder dashboard will open to you. On the right side, you can see different types of modules/widgets. In the middle, you can see a plus button. From there, you can add new sections.

Take a two-column section. Then from the right bar do the followings -

- Height: Minimum Height, Select VH and type 80
- Column Position: Middle
- Vertical Alignment: Middle
Once you have done that, click on the Update button. Now, go to the Style tab and you will see different types of Background.
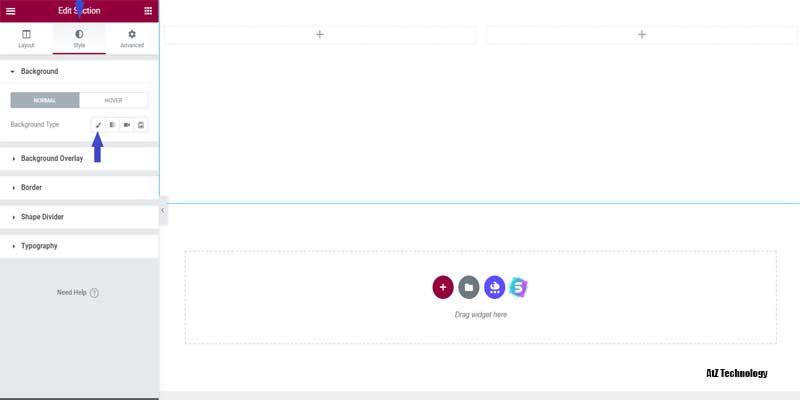
You can add new colours, gradients, images, and videos if you want. For now, I’ll add a Dark background colour.

You can change certain types of things from the Advanced tab also. But right now, we don’t need anything to be changed from there. So skip that tab. We will know about the use of those things later on.
Now, click on the 9 dot icon and you will find the Widget section again. From there, you can drag any kind of widget and put it into the section. Some widgets are free and some are locked as they are for premium. Select the Heading Widget and drag it on to the left section.

Now, edit the text. Type your name there. Then go to the Style tab again and you will find 3 things -
- Text Color
- Typography
- Text Shadow
- Blend Mode
You can set the text alignment, change the text colour and change the text types. So, do the followings with me -
- Text Color: White
- Typography: Family - Montserrat
- Size - 50px
- Update


Now, drag the image widget to the right section from the widget panel. You will find the Edit Image panel. Put your image and do some customization. Click on the Choose Image and select your image from your device. You can adjust the image width and height from the Style tab.
Alright! Not go to the Widget panel and search for Fancy Text widget. Drag it under your name heading and you will find the customization panel.
Now, in Prefix Text type “Expert In” and Inside those three strings put the information that you are capable of. As I’m a Web Developer, I’ll write as a Web Designer, Web Developer, and SEO Specialist. From Fancy Text Settings, you can change the Animation settings of the text. Make sure to align the content center. Also, add -40 top padding from the Advanced Tab.

After that, go to the Style and change the text Typography. Then, click on update. Now, we will add some social icons under the fancy text.
Search for Social Icon from the Widget and drag it under the fancy text section. Then again you will see the edit section. Now, this looks really weird right! So, change the social icon color and transparent the Primary color of it. Follow me like this -
- Click on Facebook
- Click on Color
- Select it Custom Color
- Transparent the Primary Color
- Do the same for the rest of the Icon
Also, you can put your social media link in the Link Box. Example: (https://www.facebook.com/showmikhassan455/) Now, from the Style tab you can change the Icon Size, Spacing, Row Gap, and so on. Play around with that and you can see the difference.
Now, let's go to Advanced and you will find Margin and Padding. From there, you can move those icons. You can add margin and padding on all sides or specific sides. Now follow these steps-
- Unlink the Margin
- Add -13 px margin to the left
- Add -20 px margin at the top
Now, save your changes. One thing I forgot to mention is that you can change the section width by dragging the middle line of it.

So, you learned how to customize sections and widgets by using Elementor Page Builder. In the next section, we will skip that type of customization as I think It’s really clear to you. But don’t worry I will guide you in as much detail as possible.
Add About Section
Under the section click on the Add New Section again and select two columns. Now adjust them as you want. Select Minimum Height from the Height Tab. On the left, put your Image and on the right section take a heading Widget. Edit the description and write About Me. Then drag a Text Editor widget under the heading and write the content about you.

Then add an Inner Section widget under it. Now add two buttons in that Inner Section. Now, design your button as you like. Edit Button 1 as Hire Me and the other one as Download CV. Change the text color and typography as we did earlier. Make sure to maintain the same design as we did earlier. You can also add an icon in the Button widget.

Skill Section
It’s time to add your skills to your portfolio website. We are going to use the EA Progress Bar in this section to showcase skill ratings.

First, add a heading and then add the Inner Section widget. Inside the Inner, Section drag the EA Progress Bar. Then Edit the Progress Bar widget. Follow these steps -
- Add New Section
- Add a Heading
- Name the Heading as Skill
- Add 3 Inner Section under it
- Add EA Progress Bar
- Edit the Title and Counter Value (Example: WordPress 90%)
- Duplicate the Widget and Place it into the blank Inner Section
- Then Change the Title and Counter Value as you want

Service Section
You need to add your services to your website. We will add Icon Boxes and edit the content.

Do the following with me -
- Take a New Section
- Add Background Color: #383838
- Add Service as Heading like previous
- Make it White from the Style Section
- Add Inner Section Under it.
- Add Icon Boxes into them.
- Edit them as you want.
- Change the Icon from the Icon Library.
- Change the Icon Color and Make it White.
- Resize the Icon (My Preference 35px)
- Change the Typography as previous.
- Edit the Description Content as you want.
- Now Duplicate the Widget and Edit the content as you want.

So, the Service Section is done. Play around with it and you’ll do better than me in designing.
Experience Section
It’s time to add your experiences to the portfolio website. It’s almost like the Service Section. In Services we added Icon Boxes and edited the details. We used the Icon Position Top. But this time we will change it to the left and customize the rest of the section.
All the other changes are the same. Make sure to add your previous work experiences like the companies you worked for and the time period. But if you want to do something fancy then you can change the background color Within and make all the text and icon color vise-versa.

Latest Work
Now, add your recent work as image galleries. Search for Filterable Gallery.

We are gonna use to that. It’s an Essential Addon element. Follow these steps -
- Add New Section
- Add New Heading and Name it as Latest Work
- Change the Background Color: #383838

- Change the Heading Typography as previous
- Now drag the EA Filterable Gallery under the section
- Edit the Gallery Items, change the name and images
- From style Change the Background Color and Item Hover Color

Once you have done that let’s move onto the next section. One more thing, be sure to put sharp images. Your images put your profile on top of priority. But don’t upload oversize images as it will take more time to load.
Testimonial Section
So, without a review, it’s really hard for people to trust you. So add the Testimonial Addon and make sure to deliver your quality work. We will use EA Testimonial so that it will look different than the other default one.

Follow these steps to do so.
- Add a Heading
- Change the Typography
- Add an Inner Section
- Add EA Testimonial inside that.
- Insert the image and edit the content
- From style change the Typography
- Align the content center
- Change Image Border Radius 100px


Our Clients
Add your potential clients Brand and Logo images so that new clients can bet their trust on you. By doing these below steps you can do that easily -
- Add a Heading
- Change the Typography
- Add an Inner Section
- Add Image Carousel under the section
- Select your preferred images of your clients brand and logo
- Change the Slides to Show to 5
- Adjust the setting as you want

Contact Section
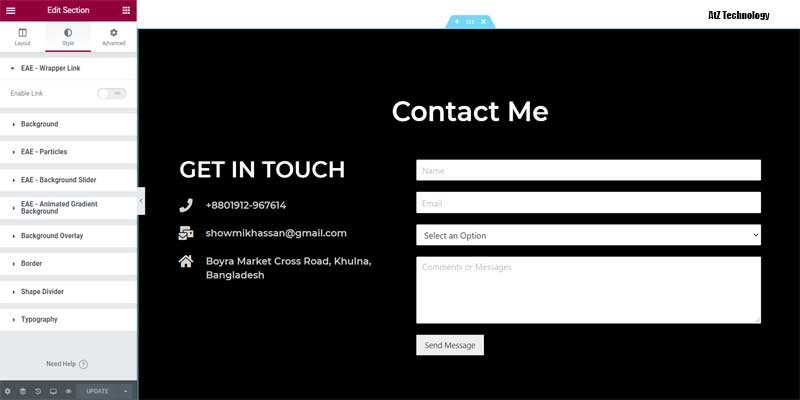
By adding a Contact Form your customers can easily get connected to you. Do the followings with me -
- Add New Section
- Add a Heading and name it Contacts Me
- Add an Inner Section under it
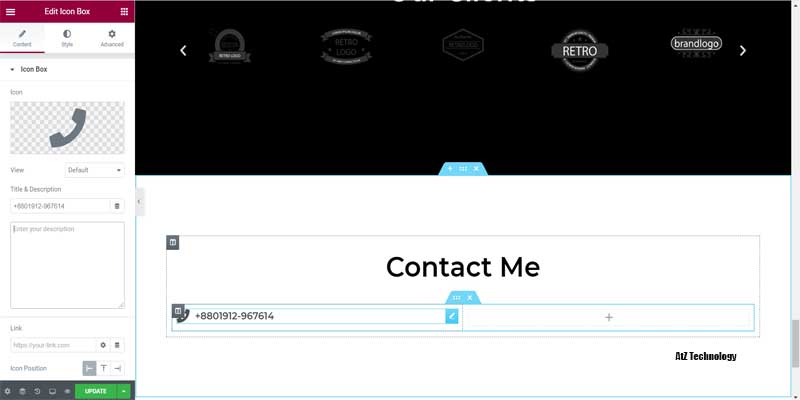
- On the left section add Icon Box
- Make it align Left
- Add Call Icon and give your contact number as Heading
- Change the Typography (Make it a little smaller)
- Duplicate that one and give your email and Address on the next one
- Now Drag the Column border and make the ratio 40:60
- Now Add Margin Top 90 to the Left Column
- Add Widget space 25
Now, go to the plugins and search for WP Forms. Install and Activate the first one appears.

After that, go to the page builder again. Search the WPForms widget by typing WPForm in the search. Drag it to the left section of the contact. Now click on the create form and follow the rest -
- Give a name to your Personal Form (Example: Personal Form)
- Select Simple Contact Form Template
- Now From left Select a Dropdown and Drag it under the Email Field

- Enter your Service name as a choice (Example: Web Design, Web Development, SEO, etc)
- Click on the plus button to add new options

- You can click on the specific field and customize it as you want
- From Advance, you can Hide the labels and Add Placeholder
- You can customize the Submit Text too
Once you have done that click on the save button and click on the close button. Now add the widget again and delete the previous one. You will find the select form button. Choose your form and you are ready to go.
Add Finishing Touches
So, we completed our designing part and now it’s time to add some finishing touches. We will build Header and Footer menus and Add a Particle Background on the top.
Add Particle Background
To add a particle background we need another free plugin named Elementor Addon Elements.
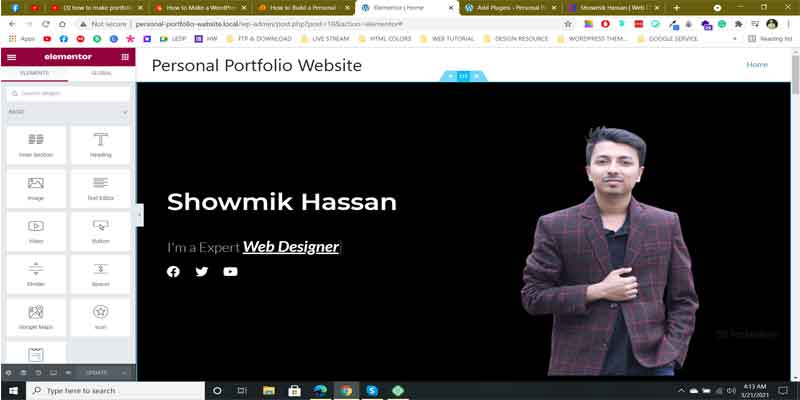
So, Install and Activate the plugin and come to the page builder again.

Follow the rest -
- Click on the six dots of the First Section (Banner With your image)
- Go to the Style Section
- You’ll find EAE Particles
- Enable it

So, now you can see particles are playing all over the banner.
Header
To add a header, go to the WordPress Dashboard and then go to Menus. From there, create a menu. Name it as the Main Menu and select the Primary Menu box. Then from the Left click on the Custom link and in the URL type #about. In link Text type “About” cause we want to link the menu with our sections we created on the Homepage. Do the same for the rest of the Section.

Now, go to the page builder again and click the About Me sections 6 dots. Then, go to advance and type the URL in the CSS ID (Example: CSS ID: about) Do the same for the rest of the section. And now hit on the update button. Check it once and you will see the beautiful outcome.

From there, go to the WordPress Dashboard again and Select Customize Your Site. You will find the Header builder on the Left Panel. Click on it and you will find 3 options. Go to the logo and upload your logo. If you don’t have any logo then you can hire someone to make one. Delete the Site Title and Disable Inline Logo & Site Title. Now, select a Site Icon. You can download any kind of png icon from Google but I will recommend you to make a Site Icon for your website.

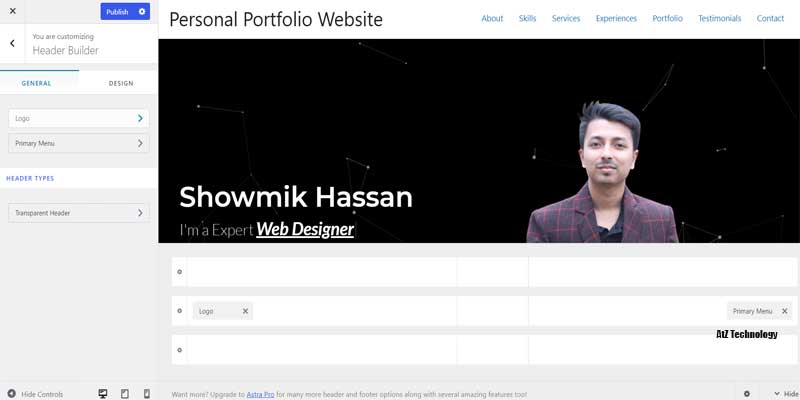
Now, Go back and click on the Primary Menu. Then go to the design tab and change the menu color as well as the menu font also. You can also change the menu Hover Style if you want. Then hit publish.
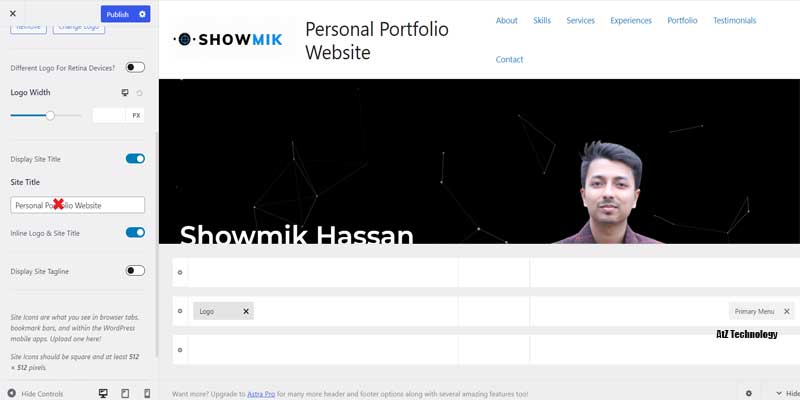

Footer
From the Theme Customization option, go to the Footer Builder then click on Copyright. Now type the following text - “Copyright [copyright] 2021 | (Your Name) | All Rights Reserved”

Conclusion
Finally! We completed our long journey and now I hope you can proudly say that you can build your portfolio website fully from scratch. If you love our article on how to make a personal website from scratch then share this article with your friends and family. There are so many options that I couldn’t cover in this article but I hope, you can try your best to find out the solutions and make it more luxurious than mine. Wish you good luck on your Portfolio Website and your business. Take care.


